
So, you have got a head full of steam for your custom bike project and a project bike lined up on eBay. What’s next? Better knock out a build table!
Here’s one I built from hardware store lumber. Nothing fancy. A couple of hours in the shop. Note this one doesn’t have the shelf shown in the plans. I added that later when I realised I had a lot of wasted space under the platform.
If you’re just getting started in DIY and custom motorcycles, then this simple project will have you practicing measuring and cutting accurately; skills that will come in handy in future projects.
Go ahead now and download and print the PDF files showing the parts you’ll need in the upcoming steps.
Drawings
Want some free drawings of the pieces needed to build this platform? I’ll send you a download link:
Send me the drawings to build the platform!

Materials Required:
1) One (1) sheet of plywood
- 1200 x 2400 x 19 mm (for the metric world)
- 4′ x 8′ x 3/4″ (for the imperial world)
2) Seven (7) lengths of dressed timber, pine or whatever is cheap in your part of the world.
- 90 x 45 x 2400mm (metric)
- 2″ x 4″ x 8′ (imperial)
Tools and Equipment:
- Tape measure
- Pencil
- Builders square
- Handsaw
- Claw hammer
- Nails – packet, 3″ or 75mm (nailing frame together)
- Nails – packet, 2″ or 50mm (nailing top and shelf to frame)
Step 1: Rip down the top
Take the sheet of plywood, and rip it down to 450mm or 15″. I did consider halving the plywood sheet, but a 600mm/2′ wide platform seemed too big.
You can use a handsaw or circular saw for this. Use one of the lengths of pine as a ruler (check it is straight and not bowed or cupped). Mark out a line down the centre and follow that with your saw.

The objective is to have two pieces the same width – one is the top of the platform, the other will become the shelf.
Not that is it critical for this project, but think about the width of your saw blade (“kerf”) if you are using a circular saw. Which side of your marked line will you cut to ensure the finished part is the correct size?
Step 2: Cut the legs
Easy peasy. Cut six legs. 2′ or 600mm long.

Step 3: Cut the long rails
The long rails support the platform and shelf. The intention is they are the same length as the plywood sheet. Depending on the stock you purchase, you might not have to trim these to length.

If you are adding the shelf, you’ll need two long rails for the platform and two long rails for the shelf. It seems like a waste to rip a plywood sheet and not use the left overs, so I elected to add the shelf for extra storage space.
Step 4: Cut the short supports
If you’re making the build platform to my plans, you’ll need eight of these short supports. You could argue the extra supports are overkill in the centre of the platform, but, meh.

Their calculated length is “Width of plywood – 2 x thickness of rails”. In metric stock sizes, mine are 360mm long (450mm wide platform minus 2 x 45mm thick rails = 360mm).
Step 5: Cut the shelf
Depending how accurately you’ve made the rest of the platform, you might have to adjust the notches in this shelf to suit your platform.

Also those with a keen eye will see my platform and shelf are not a single piece, but I used leftover plywood from another project. If it makes it easier, make this shelf in two pieces.
Step 6: Assemble
 I think the easiest way to assembly the platform is as follows:
- Find a large flat surface – workbench or concrete floor will be OK.
- Nail together two long rails and two short supports to make a rectangle. This will be the platform support.
- Nail together another two long rails and two short supports to make a second rectangle. This will be the shelf support.
- Tilt the platform support on its side and nail three legs down one long side.
- Flip 180 degrees and nail the other three legs on.
- Slide the shelf support rectangle over the legs, adjust its position to suit yourself. Ensure its parallel to the platform.
- Nail it into position
- Add the remainder of the short supports
- Nail the shelf and top on.
Step 7: Enjoy – build a custom bike!
Recently, I decided to make some modifications to my platform. The main reason was the front wheel chock I was using. While the front wheel was sitting in this chock, it was raised about 20mm above the platform. The exact stance of the bike was hard to determine because the front and back wheels were not at the same level.


Follow along to see how I addressed this problem…
Step 8: Determine alternate method of stabilising the front wheel
I fished through my steel bin and found an offcut of 100mm (4″) square tube. This was wide enough to capture a skinny front wheel (2.5″ rim width). This would work just fine.

The general idea is to notch out one face of the square tube to allow the wheel to enter, and weld it to a base plate that can be bolted to the platform:

Step 9: Fabricate the new wheel chock
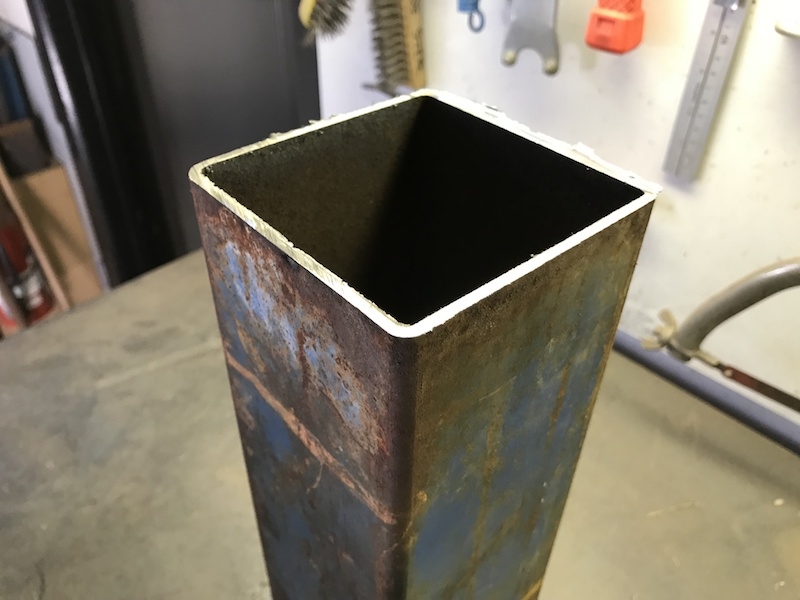
First step was to dock off the rough end of the tube:

Much better:
Then, mark out the notch needed. I left about 100mm intact at the bottom. This turned out to be unnecessary, so if you are repeating this exercise, simple cut out one wall of the tube from top to bottom:

Angle grinder plus 1mm cutting discs makes quick work of this. Smooth off the edges with flap/sanding discs in the grinder or use a file:

Since the inner walls of the tube was quite rusty, I used the angle grinder and wire wheel where it would fit, and a wire brush to clean up the rest:

Next was to clean up the rust and scale on the base plate in preparation for welding. For this I used a strip-and-clean disc on the grinder:

Its much easier to drill the mounting holes using a drill press before welding it together:

Then weld it together. I just fillet welded the sides to the base plate:

Primer and a coat of paint:

Finished:

Step 10: Mounting to the platform
Keeping it simple, I just centered the chock on the platform and marked the holes with a pencil:

The plywood platform will see a bit of load around the bolt holes, especially if the bike is tied down and pulled forward against the chock, so I elected to make large “washers” to spread the load of the nuts on the underside of the platform. Scrounging through the steel bin, I found these right-angle brackets which looked like they needed to be repurposed:

Using a square and a scribe, I marked off a line either side of the bend, essentially planning to cut the bend out:

Chop:

Drilled holes for the bolts to pass through:

And drilled the platform holes:

I had to trim the “washers” down. The black dashed line I drew on the platform surface represents where the “hidden” timber structure is underneath the plywood:

Then, bolt it all down and load the bike!


As you can see in this view, that small section I left on the front face isn’t necessary and is an impediment, especially with smaller diameter wheels and tyres (the rim in the photo is 21″). As I mentioned above, if I was building this again (and I will likely modify this in the future), I would chop out that whole front face to accept the front wheel:

Hopefully this is useful! Send me a photo of your completed platform!

