
Introduction
We’ve all been there. You’ve seen this great bike at a show, or online, and you’ve gotta build something like it. You can see yourself hammering down the street on it. You’ve scoured the interwebs and found a bunch of photos of the type of bike you love. Maybe you’ve even narrowed down the make and model of bike for a project donor. But how do you take that factory stock bike into that custom head-turning two-wheeled icon? There are a lot of soft and hard skills you need to build a custom bike. The good news is you can learn these skills. And have a LOAD of fun in the process. So if you are still with me, keep on reading. This article will be pretty long.
But! Sign off from this article now if you are impatient and have a lot of money. Just pay someone to build your bike in 12 weeks. And log off now if you don’t want to learn new skills or put in the time to practice these skills. Or if you think this will be cheaper than paying someone to build the bike for you. Or if you are happy having the same bike as the guy down the street.
Just appreciate that those bikes featured on sites like BikeEXIF have hundreds of hours of work in them. You can do it, just treat it like a long term path with lots of learning on the journey. Lets get started.
Extent of modifications
First step is determine what you’re technically capable of right now, and how long before you want to be riding this custom bike. You can take one of two approaches:
1. Make minor modifications to your project bike over time, and keep it on the road the whole time.
2. Make drastic modifications to your project bike, meaning it will be off the road until you finish.
Option (1) is my strongest suggestion for your first build. I’ve seen project bikes pulled to pieces, and then sold for less than scrap value when the owner/builder ran out of steam, or skills. Not their fault, but maybe they bit off more than they could chew. This option lets you keep riding for the most part but the visual changes to your bike might be limited. Minor modifications might be changing the seat, changing the fuel tank, adding bolt on parts, or giving it a custom paint job.
Option (2) is certainly possible, but keep reading and hopefully you won’t end up selling your project for scrap. If you loving riding like me, you better have another bike to ride during your project build. Your bike could be off the road for some time (like, two years), so if you need to scratch that itch you better have your daily rider handy.
So, lets talk about the skills you might need, or want to develop as part of the build.
The Project Bike
 At some point, you have to decide what bike will be the basis for your customisation. Maybe you’ve already decided it will be an air-cooled BMW, or a 70’s CB-Honda, or a Harley Davidson. Regardless, here are a few things to consider:
1. Older bikes are, generally, less complicated, therefore relatively easier to work on, both mechanically and electrically. If you bought a current model bike, you’d have to consider all the “electrickery” that is needed to run the engine management system, not to mention the ABS, traction control, wheelie control, electronic suspension etc
2. More common older bikes seem to have more information and more parts available. If you want to build a Triumph cafe racer, or a Harley Davidson chopper, these common platforms have plenty of reproduction, “will-fit” and custom parts available.
3. Rare old bikes, are, in my opinion, reserved for masochists. Parts and information are limited. However, if you happen to find your dream project bike cheap, don’t let that deter you. Perhaps start with a simpler project and come back to the rare project bike in a few years.
4. Any bike with a carburettor (before fuel injection) has potential. Fuel injection adds a level of complexity for passing emissions laws that you don’t really need in a custom build. In many cases, bikes were built with carburettors up to 2000, so the donor doesn’t have to be a ancient bike that is older than its owner.
My personal favourite is a 1970’s era Harley Davidson. You can buy virtually every part either used, “new-old-stock” or reproduction. There are a multitude of tanks and seats and custom parts available all over the world. There are heaps of online resources and books on these bikes. I can build a tracker or a bobber or a chopper or some other variation. And, they are quite simple mechanically and electrically. All of these factors give me the confidence to buy one as a basis for a custom build.
The following steps looking at “Design” and “Research” might help you narrow down on the style of bike you like, and further help you decide what donor bike will suit the mental picture you’ll be developing in your head. If you are looking for an inspection checklist for a project bike, click here.
Design skills
Eye is in the beauty of the beholder, but of course some bikes simply look a whole lot better than others. Some of us with design skills (not me) can sketch out their bike and get the proportions just right. The rest of us have to rely on photos of bikes to make our own assessment of what looks “right”.
My method of cheating is to find a drawing of the frame, and build my sketch around the frame. Even if the frame might need modifications, the engine mounts and other important features can be highlighted.
Have a look on the web for a drawing of the frame for your project bike. Scale off it and sketch the wheel sizes you might want to use on another sheet and cut them out. Put them next to the frame where they might be located. Sketch in a tank and seat.
We’ll cover this in much more detail in other post, but one way or another you’ve got to form a picture of your project bike. Otherwise the outcome is left to luck and chance, and perhaps you wot get the bike you wanted.
Project management skills
Wikipedia says project management is “…the discipline of initiating, planning, executing, controlling, and closing the work of a team to achieve specific goals and meet specific success criteria.” This is an entire field of study on its own, so I like this simple graphic from Kepner-Tregoe:
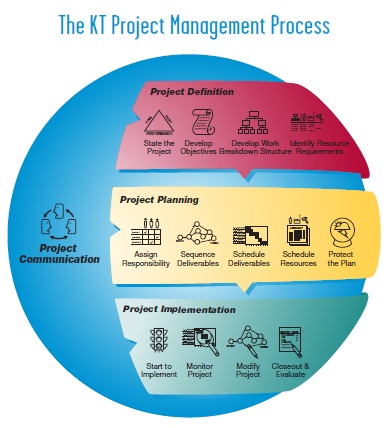
The steps are pretty self explanatory, so lets go over them quickly:
Project Definition
1. State the project
2. Develop objectives
3. Develop work breakdown structure
4. Identify resource requirements
Project Planning
1. Assign responsibilities
2. Sequence deliverables
3. Schedule deliverables
4. Schedule resources
5. Project the plan
Project Implementation
1. Start to implement
2. Monitor project
3. Modify project
4. Closeout and evaluate
Now, I’m not suggesting all of these steps are essential for every build (especially as you’ll probably doing a large chunk of the work yourself), but there are few that are worth a mention.
“Develop objectives” could be a sketch or photos of the inspiration for your bike. You could spend six months sketching your dream bike. And if this rocks your boat, then do it! And consider that the frame of your bike will determine a lot of the final look. So if you are aiming for something radical, then a custom frame (or highly modified frame) might be required, with a lot of associated work.
“Develop work breakdown structure” is a list of the actual steps, a breakdown of the tasks that make up your build. You might have a top-level idea of the tasks: “install custom seat”, “repaint fuel tank”, but you could easily break these down into a dozen sub-tasks. Even if you don’t know what these sub-tasks are, don’t worry, its not that important now, you’ll learn them on the journey, but at least make a list of the major, obvious tasks.
“Sequence deliverables” is putting the tasks into a logical order, for example, finishing frame welding and fabrication BEFORE you do the paint. It sounds obvious, and again, you might not get the sequence perfect, but you should be able to fix it with time (and hopefully not too much money).
The other steps are useful for “official” project managers. Just consider the “big picture” process I’ve listed, and see if you can follow the general steps. And go check the web for more resources if you are interested in project management.
Research skills
 Most people are pretty comfortable with the Google machine, and can find answers to most of their questions. However some sources are more useful than others. If you are sold on your project bike make and model, a dedicated forum for that model is the best source of specific information. They’re not hard to find.
The other references to look for are specific sites with the style of bike you like: chopper, bobber, cafe racer, brat, tracker. They’ll give you some ideas for that style with your project bike. And websites like BikeEXIF, Pipeburn, Return of the Cafe Racers and Chopcult can be a great source of inspiration and knowledge.
Research might extend to very specific tasks, like how to disassemble the engine in your project bike, or generic topics like how an engine works. An hour invested in research before you start a job will probably save you five hours later.
For my top recommendations for technical books to add to your collection as part of your research, check out this article.
Technical drawing skills
 Technical drawing is a topic that might sound odd amongst all these other topics. But you’ll be modifying and potentially fabricating parts for your bike, and the ability to design and draw them before you start making irreversible cuts in expensive materials is very useful. Of course drawings can be done on paper, or via CAD (Computer Aided Design). My favourite 3D modelling packages are Sketchup, OnShape and Fusion360. Sketchup is very quick and intuitive to learn and use, however, in my experience, OnShape is more powerful and useful to me personally as a mechanical engineer. Onshape recently changed their plans which has pushed me more towards Fusion360. All have features and limitations so check out their free versions. And all have excellent tutorials and communities behind them – free to access.
Regardless of the medium and tools you use, its helpful to understand how to read and construct technical drawings. There are some great tutorials on the web here and free books on the topic here.
Workshop Equipment
You are going to need somewhere to store your project bike while its under construction, and some equipment to facilitate the job.
A build platform is very helpful, and beats working on cold concrete in the middle of a cold winter. These can be constructed simply from hardware store timber (construction pine and plywood is great). I’ve got a page and some free plans dedicated to constructing your own build platform. Look at this as one of your first learning exercises. You’ll have to learn to measure out material, cut it accurately, and nail or screw it all together.
Of course you can buy both low-end and high-end platforms if you have a spare thousand dollars or so, but most people are on a budget and unless this is their profession, you can build one for your bike project for under a hundred dollars.
More sophisticated versions like my first hydraulic platform are possible, but this is an intermediate project and needs some metalworking skills and a welding machine to build.
Other equipment such as engine cranes, sandblasting cabinets and air compressors are all very useful, but not critical to own.
Mechanical skills
 Working on a motorcycle will mean you get intimate with hand tools. Wrenches, screwdrivers, pliers and a crate full of other tools will become your friends. You are going to need to start collecting tools. If you’re working on American cycles, imperial sized wrenches and sockets will generally be required. For Japanese and European bikes, metric sized tools will generally be required. Note I said “generally”. There will always be an exception and you’ll soon search out and find those specific tools that you need for your bike.
If you are shopping for tools, buy the best you can afford. Higher quality tools are manufactured from better steels, have better heat treatment and a better finish. They’ll last your lifetime if you look after them. A perfectly valid option is to scour eBay and your local trading sites for quality second hand tool sets. You might be able to buy better quality at used prices. Quality tools also give you a sense of satisfaction when working on your bike. You know you can always rely on quality tools, they limit damage to your parts, to the tools themselves, and minimise the risk of you injuring yourself. And they tell you, and others, that you are serious about working on your bike.
A basic set of mechanical tools including sockets, wrenches, screwdrivers and pliers is a good start. Check out my suggestions here. These kits and others similar are available from your local hardware or tool suppliers. You can, and probably will, continue to grow your tool collection over years of working on your bike.
After buying these tools, you need to learn to use them correctly. I’ve created a hand tools page with some fundamental videos. These will give you a brief introduction to these tools and how to use them.
You can also download this US Army Technical Manual from my Google Drive which has tons of useful information about different hand tools and how to use them.
Electrical skills
 I meet lots of people who seem intimidated by electrical systems on their motorcycles. But the electrical system is no more, and maybe even less intimidating then complex carburettors, for example. With enough skill, you can easily tackle electrical systems, especially on older motorcycles.
Again, I’ve got a page about the basics of electrical systems. This will give you some fundamental knowledge to understand functionality.
Depending on the work you need to do on the electrical system, the tools and consumables (wire, connectors, heat shrink etc) will vary. We’ll cover this in a lot more detail in future articles and videos. At the very least you should invest in a digital multimeter for taking voltage measurements. These can be very inexpensive, and quite adequate for occasional use while working on motorcycles. I’ve got some more suggestions here on Kit.com.
There are lots of references and books available on the topic. Most of the forums will have a lot of threads about the electrical system on your project bike, which will be a very specific source of information. Funnily enough, I didn’t really find many useful resources when researching this article. Lots of published material seems to assume you start with a good chunk of knowledge. But how do you get that basic knowledge in the first place? Again, we’ll cover this in extreme detail in further articles, but for now, put “electrical” on the list of topics to research.
Metallurgy
According to Wikipedia, metallurgy is, among other things, the “technology of metals”. Understanding metals and their properties helps to correctly select a metal for a particular application. When you are customising a motorcycle, you end up working with metals in some manner.
Considering this, like all of the topics we are talking about in this article, is a complete branch of science and engineering, we will have to learn enough to make a good decision about metals on our motorcycle so we don’t kill ourselves or anyone else. I’ve kicked it off with an article about the basic properties of metals, which are fundamental to the topic.
Generally, metals are divided into “ferrous” (those containing the element Iron) and “non-ferrous” (those not containing Iron). If you mix metals together to produce a metal with specific properties, it is called an “alloy”. A numbering system is used to identify the alloy and its contents. “300-series” is generally stainless steel. Go take a fork out of your kitchen drawer. If it is stamped with “Stainless 18-8”, it means 18% Chromium and 8% Nickel, making it a grade “304” stainless steel. “Chrome Moly Steel” (or “CrMo”) is Chromium and Molybdenum mixed in with steel (which itself is Iron and Carbon). Chrome Moly steels are identified by the 4100-series numbers.
Aluminium (or “aluminum” for my North American friends) is another important material for motorcycles, due to its relatively high ratio or strength to weight. We’ll talk about these properties in far more detail later on, but the alloys of aluminium are very important in aerospace and automotive applications. We can make use of aluminium for lightweight applications like tanks, fenders and bodywork, and non-structural parts like brackets or machined bar for use as spacers or footpegs. You definitely wouldn’t choose to weld up a motocycle frame out of aluminium tubes. Have a look at modern sportsbike to see the size of the aluminium castings used for frames or swingarms.
The common metals I use on custom motorcycles are steels (of various alloy, including stainless steel), aluminium and some bronze for bushings. These are all available at your local metal merchant, or online. We’ll talk about these applications in a later article.
Benchwork skills
Benchwork is the use of basic hand tools to shape and form metal into shapes that you need. If you are building a custom with many “bolt-on” parts, there is a chance you finish your build without ever picking up a scribe, hacksaw and file. But if you need (or want) a custom number plate bracket, relocate your speedometer, make some custom rear-set pegs, or build a complete fairing out of aluminium for a salt lake racer, you’ll need to start with benchwork.
Personally, I find benchwork the most satisfying activity when working on bikes. You take a sheet or chunk of metal, and cut, file, sand and finish a completely custom, one-off part that nobody else has. This is where you can let your creativity shine.
We’re going to cover a complete course later in benchwork, but for now, have a look at my benchwork tool list on Kit.com
Metalworking and Fabrication skills
Once we have painstakingly shaped a piece of metal on the bench, you generally need to perform some other “operations” on it. You can cut, bend, shrink and stretch metal. Drill holes in it. Tap threads into it. Bolt, screw, rivet or weld pieces together to form more complex assemblies. All of these subsequent operations are required to give you a part with the desired form and function. You might see now how the earlier steps of Design, Project Management, Technical Drawing, Metallurgy and Benchwork are parts of the process helping you reach this step.
We’ll cover other metalworking operations in detail later, but keep following along on the journey to build your skills to this point, where the customising fun on your bike really kicks off.
Metal shaping skills (advanced)
 As mentioned above in “Metalworking and Fabrication”, the four basic operations you can perform on metals are cut, bend, shrink and stretch. “Cut” and “Bend” are self explanatory. If I was making an “L”-shaped bracket from some flat sheet metal, I would need to cut it out, then bend it into an “L”. But the art of metal shaping combines the additional steps of “shrinking” and “stretching” metal to form complex curves. Fenders and tanks are made by using these additional processes. Metal shaping is an art and science on its own, but some of the basics can be applied to motorcycle parts using basic hand tools, some practice and lots of patience. Some of those tools are shown in this list on Kit.com.
Welding skills (advanced)
 When you’ve really got to step it up, you can start making more radical changes to your bike with some fabrication and welding skills.
By far I would recommend TIG (Tungsten Inert Gas), or more correctly “GTAW”, which stands for “Gas Tungsten Arc Welding”. TIG welding provides lots of flexibility in the types of metals that can be welded (ferrous and non-ferrous metals – with the right welding machine) and the thicknesses of materials welded for motorcycle jobs.
Welding is another complete skill and field of study, but you can definitely pick up enough to do some customising of your motorcycle. A quality welding machine that will weld both ferrous and non-ferrous metals will probably cost in the vicinity of $1000, so it is a significant investment. The best source of info for beginners (and more advanced welding) is Jody’s channel on YouTube, Welding Tips and Tricks.
Machining skills (advanced)
 Sometimes you need a special part for a special application. Maybe you’re adapting a different front wheel to your project bike, or need rearsets and none are available off-the-shelf.
In these cases there is often no way of proceeding unless you can access a lathe and a milling machine. This is a really advanced topic as only 1 in 100 might have access to this equipment, and the rest will have to find an engineering shop prepared to make their parts (obviously at some cost).
Lathes and milling machines can be had second hand at reasonable prices, however the tooling that is required with each can double or triple that cost.
Surface preparation skills
Almost every customised bike project is going to need paint, powder coating or polishing to deliver that picture you have of your finished project. Preparing surfaces for these finishing techniques is essential if you plan to paint or polish yourself, or if you want to save some money not having to pay your paint or powder coat guy to do this step for you.
Your project bike might be suffering the effects of age and neglect, with caked on dirt, oil leaks, corrosion, scratches and chipped paint. All these issues are easily addressed with know-how and elbow grease. And if you are aiming for a show-class finish, its essential to prepare all your surfaces meticulously for the final finish.
There are lots of tools, tips and techniques you can apply to both speed up surface preparation and achieve great results in your own workshop.
Painting/Polishing skills
Once your bike parts have been stripped, cleaned, welded, sanded and otherwise modified, its time for the final finish and reassembly. Its surprising how much can be achieved in the home workshop with aerosol cans of paint. Would a professional painter in a spray booth achieve a “better” finish? Yes, of course. But you can learn plenty, achieve a sense of satisfaction, and control the costs of your project build by applying some of your own paint.
Polishing is somewhat similar. I have achieved mirror finishes on steel and aluminium using a systematic process in my home workshop. I’ve got a page covering this on my site.
The Reveal
 Once you have combined all these elements, you have a custom bike, built by you, to your specifications. It might take two years, or five years, or ten years, but you’ll have the ultimate satisfaction that it was all done by you.
Want a downloadable checklist of the skills you might need to customise your bike?

