
If we’re going to make attractive, accurate parts for a motorcycle’s, the more care and attention we take with the marking out, the better the finished part will be.
And for making out, we really need a edge or a face or a center line that’s accurate that we can work away from. So that’s the first step in marking out, that’s how we get accurate work, and how we need to look at the stock that we’re using to choose the right part or the right piece to use for our project.
Once we’ve figured out what stock we’re using and what part we’re going to make, we need to look at the tools we’re going to be using for marking out. So let’s head to the bench top and go through the basics.
Scribe
The first thing is a scribe. I have a bunch of different scribes of different prices.

Double-ended scribes are a few bucks each in the hardware store. I generally use this style when I’m welding, and when they get damaged they’re only a few bucks so I’m not too worried about them.

This one’s got a carbide tip. Tungsten Carbide is a lot harder than steel so will stay sharper longer compared to the basic double-ended scribe.
Punches
So the next thing we’re going to need is a couple of punches. Now there’s two – these look the same but they’ve got different applications. And the main difference between them is the angle of the point. So let’s make sure we can see what’s going on here. This first one is called a dot punch or prick punch.

This second one is called a center punch.

The difference is the angle of the tip. The dot punch has a 60-degree included angle, and the center punch has a 90-degree included angle.
The dot punch is used for picking up features of scribed lines, and because of the sharper angle of the point, it’s easier to get it into a scribed line and use it for marking out intersections of scribed lines.
Once you’ve used the dot punch with a hammer and made a little dot in the metal, it’s a lot easier to come back with the center punch – which is the 90 degree punch – and use that to make a bigger, wider hole in the dot you’ve made, which might be needed for a drilling operation that will be following.
So both these punches have got their own application and you’ll see me use them in the marking out projects that we do later on. So 60-degree dot punch, 90-degree center punch. Of course, you could cheat and purchase two centre punches, and regrind one to a 60-degree angle on a bench grinder if you wanted.
Hammer
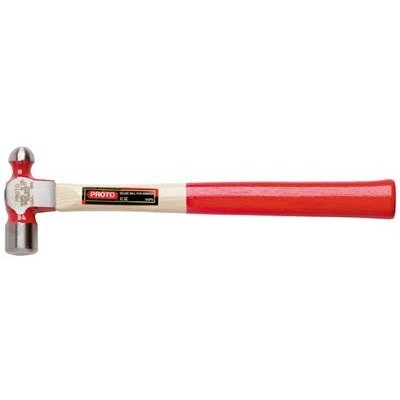
To strike those punches, you’re going to need some sort of a hammer – an engineer’s ball-pein hammer. Twenty-four ounces is the weight I like best. This might be a little heavy for some people, so go into the store and compare it to a 20-ounce hammer.
I will occasionally use a lighter one – 16-ounces – for marking out softer materials, such as aluminium. If you’re going to buy one, I would suggest 20 or 24-ounces depending on how comfortable you feel swinging the larger hammer.
Sometimes I find the smaller one doesn’t have enough weight if you really need to hit something hard, such as when bending steel. So the heavier ones will give you more impact and give you a better result if you need a harder hit.
I’m a bit old-school and prefer a wooden handle. It feels nicer to use (at least to me). If you look after them you shouldn’t have to replace a handle – mine are nearly 20-years old and still going.
Engineer’s square

Okay, next thing you’re going to need is an engineer’s square. This one is six inches, nominal, which is roughly the length of the blade. And these aren’t the same as carpenter’s squares, they’re high accuracy marking out tools, so they last a long time as long as you look after them.
I’ve had this one for a number of years, and I haven’t dropped it or anything which would tend to put them out of square. So they always stay a drawer or a toolbox away from other tools so they don’t get knocked around.
You can see there’s a very slight notch right under the blade, and that allows you to butt up some metal right up against the edge. And if there was a burr or something from, say, sheet metal from being cut, that burr would sit inside that little notch.
You can get these in all different sizes, I’ve got a little dinky one here which is helpful on very small jobs, and I’ve got a couple that are much bigger as well. So starting out, just need a six inch one. If you can get the other ones at some point later on, you can pick them up cheap, fantastic. But for now, six inch will be just fine.
Calipers
Next two tools – calipers. If you’re marking out arcs or you want to mark out a constant distance, then a divider like this is the tool you could use to do that.
The better quality ones from England or the United States, I generally find on eBay. And some of the cheaper ones- the import ones that are quite a bit more flimsy – you can get new at the hardware stores and things, and they’re really quite inexpensive.

So the dividers are used for marking out arcs, you can really just use them as a compass, so you can mark out an arc, or if you want to mark out a constant distance, you would be using them to mark out the same distance along a line. So quite useful for arcs especially. You need a pair of dividers.

These are called odd leg, or “jenny” calipers. And the objective of these calipers is to mark a line parallel to an edge. The edge hooks over the stock and then you’re able to scribe a parallel line to the edge. So, very useful, and these ones are dirt cheap, a few dollars at a tool store, quite useful and you’ll need them in many marking out projects.
Rules
Last essential tool would be some sort of measuring equipment, and steel rule is perfectly adequate for the sort of work we’re doing here. We’re not building space shuttles so we don’t need anything more high tech at this point.

Stainless steel rules, six-inch and 12-inch, are very useful. The ones pictured have both metric and imperial measurements, which is helpful. I’ve picked them up for a dollar each in the stationary aisles in some of the variety stores. When you get them for a dollar, I buy five or six and just leave them around my shop, so I’ve got one handy all the time. So they’re not very expensive, and they’ll be accurate enough for the sort of work we’re doing on our motorcycles.
Another thing to look out for on your rules is the end and the corners get a bit worn with use (and dropping them on concrete!). If that happens, you’ll have trouble measuring accurately from that end.
So often you might start measuring from the one inch or the ten millimeter mark because the end is a bit damaged. So, once they get to this point where the edges are rounded, they become a little less useful. So you’ve just got to be careful, don’t leave them lying around, don’t have them banging around in the toolbox with other tools.
All of these have got a hook hole in the end so I generally hang them all up and have them away from the concrete floor or any other bits of metal that might damage them.
So there’s an overview of the tools we’re going to need for the marking out projects we’ve got coming up, so keep an eye out for them. You can get them quite inexpensively in the hardware stores, and you’ll find them on Amazon via the links in the text above.
Need more help using these tools? Get training and community support in our private member forum, or just grab our Metalwork #1 video training course.

